Many people asked me how I built my digital garden. Here is a short step-by-step guide to create your own. The final files are here. We will not cover styling—there are lots of great resources to learn CSS out there.
What’s the difference between a digital garden, a note-taking app, and a blog? You can see the digital garden sitting between the former and the latter. It’s a place to share your evergreen notes—not raw notes you may have stored in your note-taking app, but not quite the level of polish you would expect on a blog. Creating a digital garden is a great way to receive early feedback on your ideas. Over time, several posts in your digital garden may be combined to create longer essays to post on your blog, but it won’t necessarily be the case.
In order to help you go from note collector to original content creator, your digital garden should ideally make it as easy as possible to explore the connection between various seeds of ideas so new ones can sprout. You want to interlink your notes and create a knowledge web unique to your mind and areas of interest.
Quick note before we get started: because it can be hard to understand how saving works with TiddlyWiki, please do not close your browser until you are done with this tutorial. The whole tutorial should not take longer than 20 minutes.
1. Build your backend
We will use TiddlyBlink as our backend. TiddlyBlink is a modified version of TiddlyWiki which adds lots of the features we want to have in our digital garden: bi-directional linking (backlinks), transclusion, links autocomplete, and more. Starting with TiddlyBlink will save us a lot of time.
Go to the official TiddlyWiki website and download an empty copy of TiddlyWiki by clicking on “Download Empty” (big green button)—this will download a file called empty.html to your computer. Double-click to open it in your browser. Give your wiki a name and a subtitle.

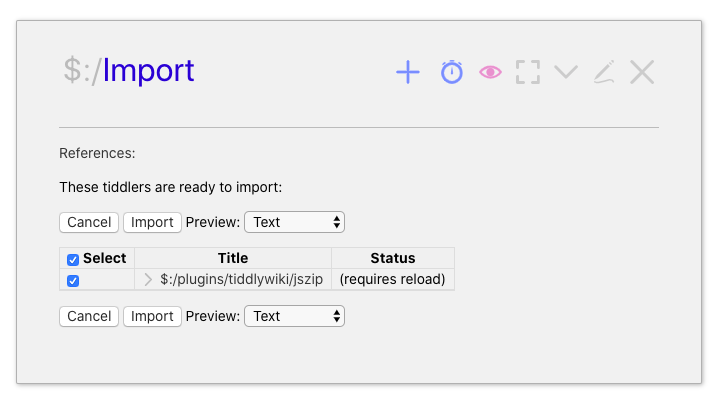
Now, go to the official TiddlyBlink website. Place two browser windows side by side: one with your own wiki (empty.html) and one with the TiddlyBlink website. Drag the “tb” yellow pill you see on the TiddlyBlink website (under “TiddlyBlink Home”) into your own wiki’s window. This will show you the list of all the files TiddlyBlink will add to your wiki. Just click on “Import” and voila! You now have bi-directional linking and all that jazz.
Next, we’ll add little popup previews of our content when hovering on certain internal links. David Gifford, the creator of TiddlyBlink, also created a nifty little add-on to create this effect I have in my digital garden, called “Transclusion in Popups.” Go to his website and drag the two files he lists there into your own wiki, then click on the “Import” button.
Finally, we’ll add a static website exporter which is much easier to use than the native one. Go to this page and drag the plugin to your own wiki. You have to drag the part with a little puzzle icon which turns blue on hover. In your own wiki, click on the “Import” button again to confirm.
Click on “save” (the red icon in the right menu). This will download another copy of the empty.html file which includes all these add-ons and plugins, often automatically called empty (1).html. Close the original empty.html (you can move it to the bin to keep things clean), and open empty (1).html in your browser for the next part.
2. Create some content
We will now populate our wiki with some dummy content so you understand how structuring your notes work.
Create a first note, and type “My notes” in the title field. In the content field, paste the following: “I look forward to sharing my notes with you all.” Save this note.
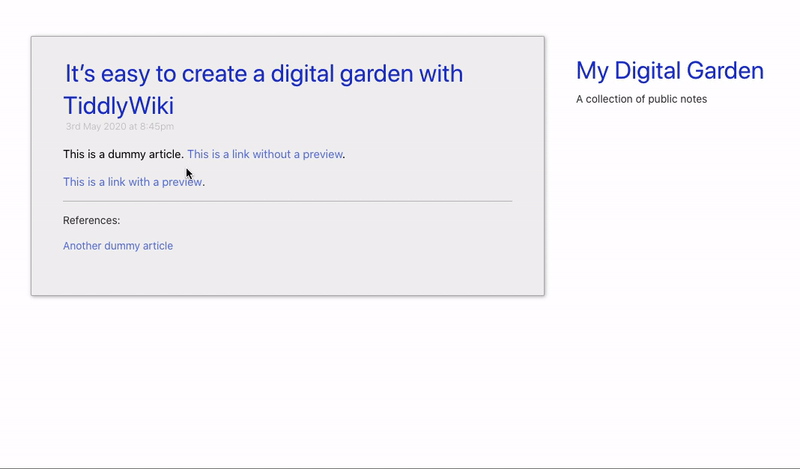
Now, create a second note, name it “It’s easy to create a digital garden with TiddlyWiki”, then paste the following:
This is a dummy article. [[This is a link without a preview|Another dummy article]].

<div class="tooltip">[[This is a link with a preview|My notes]]<div class="tooltiptext"><$transclude tiddler="My notes" mode="block"/></div></div>.
Save this note. Hover your mouse over “This is a link with a preview”—you should see a popup displaying the content of “My notes”!
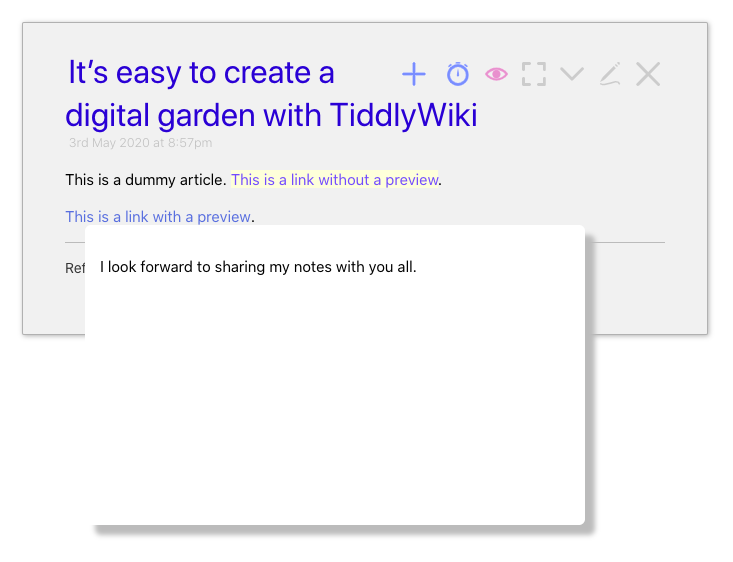
You will also see that “This is a link without a preview” is highlighted in yellow. It means this note doesn’t exist yet. Click on the link, then click on the pen to create the note. Type whatever you want in the body area and save this one as well. You now should have three notes: “My notes”, “It’s easy to create a digital garden with TiddlyWiki”, and “Another dummy note.”
Click on “save” (again, the red icon in the right menu) to download a fresh copy with all the content we just added. Close empty (1).html, and open empty (2).html. (yes, you have to do this again, don’t skip this step)
3. Export as a static website
A new, easier way to export your wiki as a static website was just released, making it super easy to do so without installing a server on your computer. We already installed the plugin in the first part of this tutorial, now let’s use it.
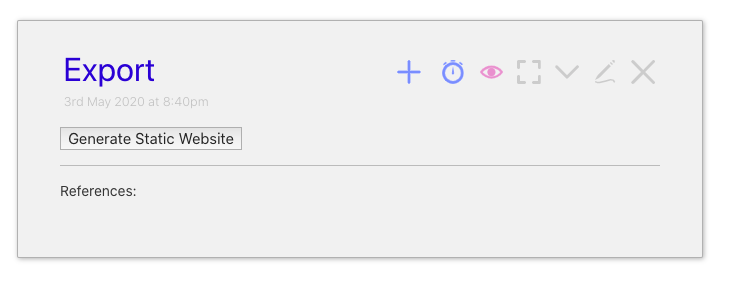
Create a new note called “Export” and paste the following in the body:
\define my-static-website()
<$action-sendmessage $message="tm-zip-create" $param="$:/temp/_ZipTiddler"/>
<$list filter="[all[tiddlers]!is[system]limit[100]]">
<$action-sendmessage $message="tm-zip-render-file" $param="$:/temp/_ZipTiddler" filename={{{ [<currentTiddler>encodeuricomponent[]addsuffix[.html]] }}} tiddler=<<currentTiddler>> template="$:/core/templates/static.tiddler.html"/>
</$list>
<$action-sendmessage $message="tm-zip-render-file" $param="$:/temp/_ZipTiddler" filename="static.css" template="$:/core/templates/static.template.css"/>
<$action-sendmessage $message="tm-zip-download" $param="$:/temp/_ZipTiddler" filename="digitalgarden.zip"/>
\end

<$button actions=<<my-static-website>>>
Generate Static Website
</$button>
Save the note, and click the “Generate Static Website” button that appears.
A ZIP file called “digitalgarden.zip” will be downloaded to your computer. Open it, then double-click on “My notes.html” to open it in your browser.
As you can see, backlinks are working in the “Reference” section. Let’s click on “It’s easy to create a digital garden with TiddlyWiki” to open that note. Hover your mouse over “this is a link with a preview”—you should see the same popup we saw in the backend.

Voila! That’s a very quick way to create your very own digital garden with bi-directional links, transclusion, and all the good stuff that comes with TiddlyWiki and TiddlyBlink. It’s not very pretty right now, but you can play with the HTML and CSS to make it your own. As I said, we won’t cover styling, but if you want to make your life easier, you can have a look at Bootstrap.
For styling your digital garden, the two files you want to look at are $:/core/templates/static.tiddler.html and $:/core/templates/static.template.css (which you can access in your TiddlyWiki by clicking on More > Shadows in the right side menu).
If you don’t want to go through all the steps yourself or just want to see what the final result looks like, you can download the final wiki file here. Open it in your browser, add some more notes if you like, then click on the “Generate Static Website” in the “Export” page.
Finally, as you’ve seen, it’s a bit cumbersome to keep on saving new copies of your wiki. There are many different saving methods to address this, but Timimi is probably the best and easiest.
If you want to publish your digital garden on the web (after all, the point is to foster collective thinking), you can host it with any free static website hosting provider, such as GitHub, NeoCities, Netlify, or Vercel. Here is a nice list of options. I also recently discovered this super easy and free method to host your website from Google Drive. That’s it. Have fun!
BONUS. I know I said no styling, but I’m just going to give you two tiny tweaks that will make your digital garden look better. First, you’ve probably noticed there’s no title or description on the static website that’s automatically generated by TiddlyWiki, so let’s add that back.
Click on More > Shadows in the right side menu, then CMD+F or CTRL+F to find this one in the list: $:/core/templates/static.tiddler.html. Click on it top open it, then click on the edit icon, and paste the following just under the body class="tc-body" tag:
<div class="tc-sidebar-scrollable" style="overflow: auto;">
<div class="tc-sidebar-header"><h1 class="tc-site-title">My Digital Garden</h1></div>

<div class="tc-site-subtitle">A collection of public notes</div>
</div>
Save this tiddler and now search for $:/core/templates/static.template.css. Open it and paste the following at the bottom:
.tc-tiddler-controls {
   display: none;
}

.tc-tab-buttons {
   display: none;
}
This will remove the control buttons from your static website. Save the tiddler, then go back to the Export page, and give it another go. Much cleaner already!